
A Spooktacular Treat for Halloween Recipe
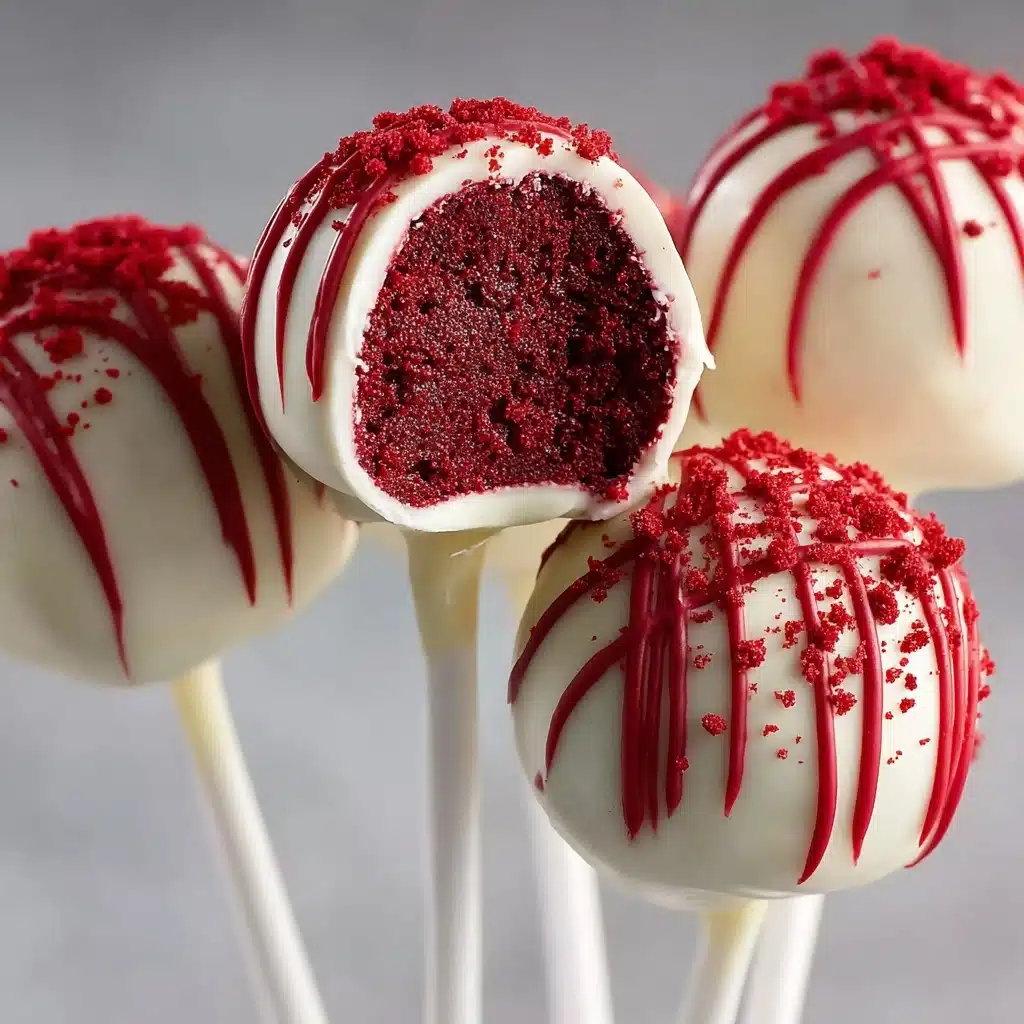
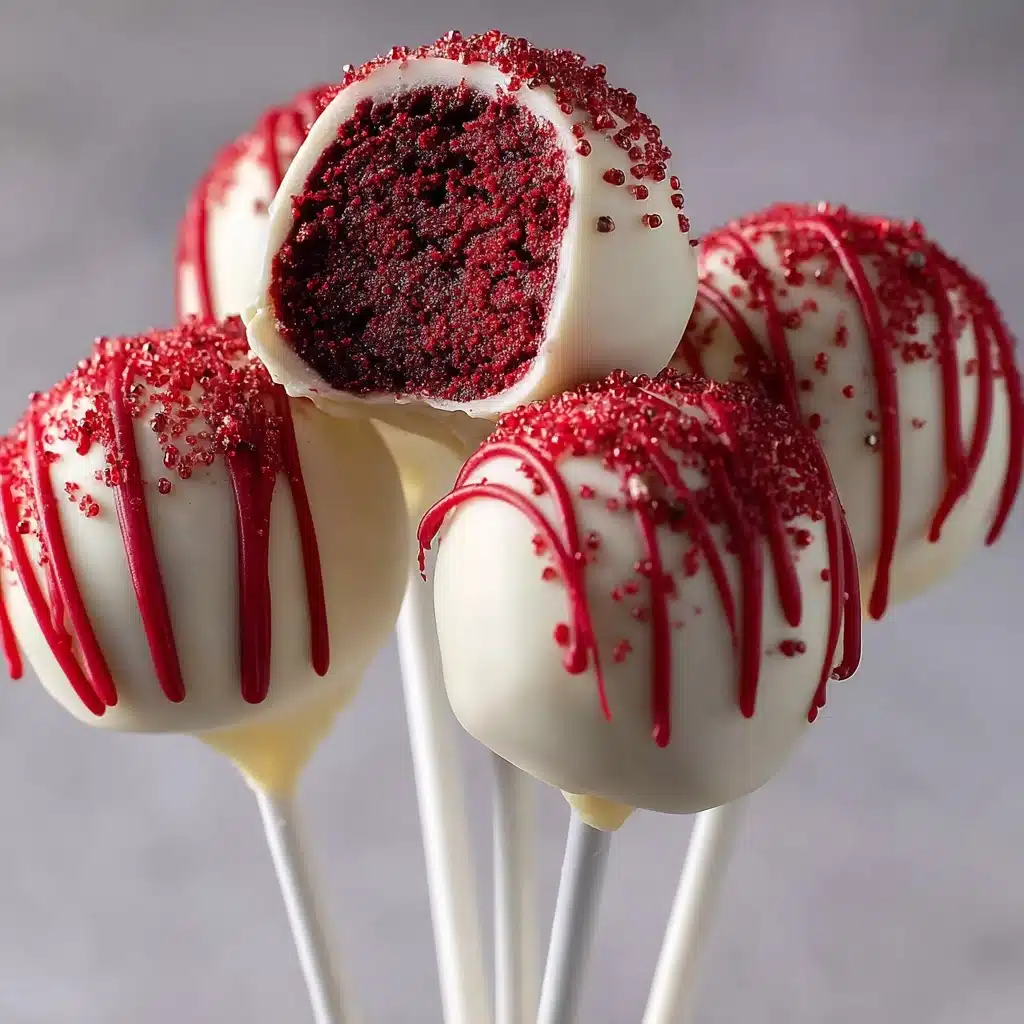
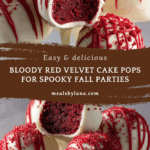
Get ready to indulge in a wildly fun and delicious dessert that’s perfect for all your spooky celebrations. These Bloody Red Velvet Cake Pops are truly A Spooktacular Treat for Halloween, combining rich red velvet cake infused with creamy frosting, all wrapped in a white chocolate coating splattered with a dramatic “bloody” drizzle. They’re irresistibly charming and deliciously festive, making them the star of any Halloween party or gathering. Once you try these, you’ll see why they make such a perfect and memorable A Spooktacular Treat for Halloween!
Ingredients You’ll Need
Creating this hauntingly delightful treat is surprisingly simple, thanks to a handful of easy-to-find ingredients. Each one plays a crucial role in building the perfect balance of flavor, texture, and that eye-catching Halloween look.
- Red velvet cake mix: The base that delivers moistness, vibrant color, and that classic subtle cocoa flavor.
- Eggs (3 large): Vital for structure and helping the cake rise beautifully.
- Vegetable oil (½ cup): Keeps the cake wonderfully tender and moist.
- Water (1 cup): Essential for the proper consistency of your batter and to activate the cake mix.
- Cream cheese frosting (1 cup): Adds creaminess and slight tang, binding the crumbled cake perfectly for shaping.
- White chocolate chips (2 cups): The coating that provides a crisp shell and contrasts beautifully with the red “blood.”
- Red food coloring (1-2 tablespoons): Adds that dramatic bloody effect that turns your cake pops into a Halloween masterpiece.
- Lollipop sticks: For easy holding and presentation, turning each bite into a fun experience.
How to Make A Spooktacular Treat for Halloween
Step 1: Bake the Cake
Start by preheating your oven to 350°F (175°C) and preparing your cake pan so your batter doesn’t stick. In a bowl, combine the red velvet mix with eggs, oil, and water according to the instructions until the batter is smooth and velvety. Pour it into the pan and bake for about 25-30 minutes. Once baked, let it cool a bit in the pan, then transfer to a wire rack to cool completely. This foundation is where all the fun begins!
Step 2: Crumble the Cake
When your cake is fully cooled, crumble it into fine, fluffy crumbs using your hands or a fork. This gets the texture just right for forming into pops. Next, add in the cream cheese frosting and mix thoroughly so the crumbs stick together but stay moist and tender. This mixture is what turns simple cake into the perfect base for your pops.
Step 3: Form the Cake Pops
Grab about a tablespoon of the mixture at a time and roll it into smooth, even balls with your hands. No need for perfect spheres—just aim for uniform size so they bake evenly. Place each ball on a parchment-lined baking sheet and pop them into the fridge for at least 30 minutes; chilling helps them hold their shape when dipping.
Step 4: Prepare the Coating
While the cake balls are chilling, melt your white chocolate chips carefully in the microwave in short bursts, stirring frequently until silky smooth. Divide the melted chocolate into two bowls—add red food coloring to one to create your “bloody” decor. This contrast is what makes this recipe a true A Spooktacular Treat for Halloween, so don’t be shy with the vivid red!
Step 5: Assemble the Cake Pops
Take the cold cake balls and dip the tip of each lollipop stick into plain white chocolate before inserting it into the center of one ball; this step secures the stick in place. Then, fully coat each pop in the white chocolate. Let any excess drip away. Next, channel your inner artist by drizzling or splattering the red chocolate on top, mimicking a gory “bloody” effect. Use a fork or piping bag for precision. These finishing touches are what make this recipe an unforgettable A Spooktacular Treat for Halloween.
Step 6: Set and Serve
Place the finished cake pops upright in a stand or foam block and let the chocolate harden completely. This ensures your pops look neat and hold sturdy. Once set, they’re ready to delight guests with their spooky charm and delectable taste—your perfect A Spooktacular Treat for Halloween is ready to be enjoyed!
How to Serve A Spooktacular Treat for Halloween
Garnishes
Add even more flair by decorating your cake pops with edible glitter, tiny candy eyes, or sprinkles before the chocolate sets. The garnishes not only amplify the festive vibe but also add intriguing textures and colors that will wow your guests.
Side Dishes
Pair these indulgent cake pops with light accompaniments like fruit punch or spiced cider to balance richness. A crisp apple or carrot sticks with dip keeps the spread interesting and prevents it from being overly sweet.
Creative Ways to Present
Give your party a thrilling atmosphere by arranging the cake pops in a pumpkin-shaped pumpkin or a cauldron prop filled with crushed cookies for “dirt.” You can also use themed trays or spooky jars to showcase them as the centerpiece. Presentation takes your A Spooktacular Treat for Halloween from tasty to unforgettable.
Make Ahead and Storage
Storing Leftovers
If you have any leftover cake pops, store them in an airtight container at room temperature for up to two days. Keep them away from heat and moisture to maintain their crisp coating and tender center.
Freezing
To freeze, place the cake pops in a single layer on a baking sheet and freeze until firm, then transfer to a freezer-safe container or bag. They can be stored for up to one month. This means you can prepare your A Spooktacular Treat for Halloween in advance without any hassle.
Reheating
Thaw frozen cake pops in the refrigerator for a few hours before serving. Avoid microwaving as it can melt the chocolate coating and change the texture. Just patience pays off with the best taste and appearance.
FAQs
Can I use homemade red velvet cake instead of cake mix?
Absolutely! Homemade red velvet cake works wonderfully and adds a personal touch. Just make sure it’s cooled completely before crumbling for the best results.
What can I substitute for cream cheese frosting?
If cream cheese frosting isn’t available, buttercream works as a substitute, though cream cheese adds a tangy balance that really complements the red velvet flavor.
How do I prevent the cake balls from falling apart?
Chilling the cake balls before dipping helps them firm up so they’re easier to coat without crumbling. Also, adding enough frosting to the crumbs ensures they hold together well.
Can I make these without white chocolate?
You can substitute with candy melts or any melting chocolate you prefer. Just be aware this will slightly change the flavor and texture of the coating.
How long do the cake pops stay fresh?
Stored properly in an airtight container, these cake pops stay fresh for about 2-3 days at room temperature. For longer storage, freezing is your best bet.
Final Thoughts
There is something truly special about serving a lovingly made A Spooktacular Treat for Halloween. These Bloody Red Velvet Cake Pops are guaranteed to impress your friends and family with their spooky appearance and delightful flavor combo. Whether you’re throwing a big Halloween bash or just want to add a fun twist to your fall festivities, these cake pops will bring joy and excitement to your table. So grab your ingredients and dive into this festive baking adventure—you won’t regret it!
Print
A Spooktacular Treat for Halloween Recipe
- Total Time: 1 hour 30 minutes
- Yield: Approximately 24 cake pops 1x
- Diet: Vegetarian
Description
Bloody Red Velvet Cake Pops are a spooktacular and festive treat perfect for Halloween. These moist red velvet cake balls are coated in a smooth white chocolate shell and dramatically drizzled with red chocolate to create a striking blood-like effect. They are easy to make, fun to decorate, and guaranteed to impress guests at any Halloween party.
Ingredients
For the Cake:
- 1 box red velvet cake mix (or homemade red velvet cake equivalent)
- 3 large eggs (as per cake mix instructions)
- 1/2 cup vegetable oil (as per cake mix instructions)
- 1 cup water (as per cake mix instructions)
For the Frosting:
- 1 cup cream cheese frosting (store-bought or homemade)
For the Coating:
- 2 cups white chocolate chips
- 1–2 tablespoons red food coloring
For the Sticks:
- Lollipop sticks (or any sturdy stick)
Instructions
- Bake the Cake: Preheat your oven to 350°F (175°C). Prepare a cake pan according to the instructions on the cake mix or your homemade recipe. In a large mixing bowl, combine the red velvet cake mix, eggs, vegetable oil, and water. Mix until well combined. Pour the batter into the prepared cake pan and bake according to the package instructions, typically for 25-30 minutes. Once baked, remove the cake from the oven and let it cool in the pan for 10 minutes before transferring it to a wire rack to cool completely.
- Crumble the Cake: Once the cake is completely cooled, crumble it into a large mixing bowl using your hands or a fork until it resembles fine crumbs. Add the cream cheese frosting to the crumbled cake and mix until well combined. The mixture should be moist enough to hold its shape when rolled into balls.
- Form the Cake Pops: Using your hands, scoop out about 1 tablespoon of the cake mixture and roll it into a ball. Repeat until all the mixture is used. Place the cake balls on a baking sheet lined with parchment paper. Once all are formed, chill them in the refrigerator for about 30 minutes to firm up.
- Prepare the Coating: While the cake pops are chilling, melt the white chocolate chips in a microwave-safe bowl. Heat in 30-second intervals, stirring in between, until smooth. Once melted, divide the white chocolate into two bowls. In one bowl, add red food coloring to create the ‘blood’ effect, mixing until you achieve the desired shade.
- Assemble the Cake Pops: Remove the chilled cake balls from the refrigerator. Dip the tip of each lollipop stick into the melted white chocolate and then insert it into the center of each cake pop. This helps secure the stick. Dip each cake pop into the melted white chocolate, ensuring it is fully coated. Allow any excess chocolate to drip off. For the ‘bloody’ effect, drizzle the red chocolate over the white-coated cake pops to create a blood-like appearance. You can use a fork or a piping bag for more control.
- Set and Serve: Place the finished cake pops upright in a cake pop stand or a block of foam to set. Allow the chocolate to harden completely before serving. Enjoy your Bloody Red Velvet Cake Pops at your Halloween gathering!
Notes
- Use a toothpick or lollipop stick to help coat the cake pops evenly without breaking them.
- Chilling the cake balls before dipping helps prevent them from falling apart in the melted chocolate.
- Adjust the amount of red food coloring to achieve your desired intensity of the “blood” effect.
- Store finished cake pops in an airtight container at room temperature for up to 2 days or refrigerate for up to 4 days.
- For a homemade cream cheese frosting, beat together 8 oz cream cheese, 1/4 cup unsalted butter, 2 cups powdered sugar, and 1 tsp vanilla extract until smooth.
- Prep Time: 20 minutes
- Cook Time: 30 minutes
- Category: Dessert, Snack
- Method: Baking, Mixing, Dipping
- Cuisine: American
Nutrition
- Serving Size: 1 cake pop
- Calories: 180
- Sugar: 18g
- Sodium: 110mg
- Fat: 9g
- Saturated Fat: 5g
- Unsaturated Fat: 3g
- Trans Fat: 0g
- Carbohydrates: 25g
- Fiber: 1g
- Protein: 2g
- Cholesterol: 30mg
Keywords: red velvet cake pops, Halloween cake pops, bloody cake pops, red velvet dessert, Halloween treats, cake pop recipe


