
No-Bake Dragon Fruit Mini Cheesecakes Recipe
Introduction
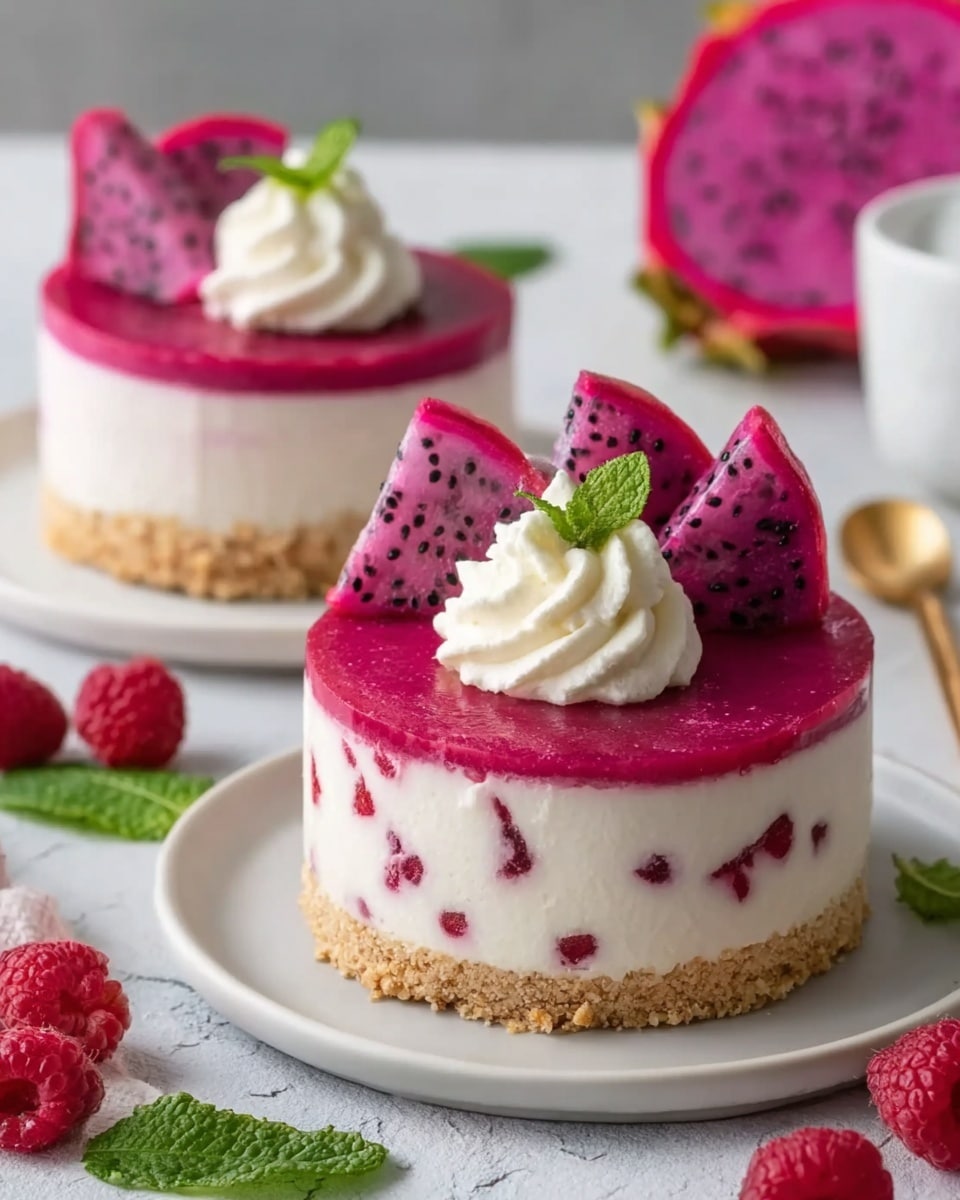
No-Bake Dragon Fruit Mini Cheesecakes are a delightful and refreshing treat featuring creamy cheesecake filling and vibrant dragon fruit. These mini desserts are perfect for summer gatherings, parties, or whenever you want a quick tropical indulgence.

Ingredients
- 1 ½ cups graham crackers, crushed
- 5 tbsp unsalted butter, melted
- 2 tbsp sugar
- 2 cups cream cheese, softened
- 1 cup heavy cream, chilled
- ¾ cup powdered sugar
- 1 tsp vanilla extract
- 1 tbsp lemon juice
- 1 large dragon fruit, pureed
- 2 tbsp powdered sugar (optional)
- 2 tsp gelatin or agar-agar
- 3 tbsp warm water
- Fresh dragon fruit cubes (optional, for garnish)
- Mint leaves (optional, for garnish)
- Whipped cream (optional, for garnish)
Instructions
- Step 1: Prepare the crust by mixing crushed graham crackers, melted butter, and sugar in a bowl until combined. Press the mixture firmly into the bottom of muffin cups to form an even layer. Place in the refrigerator to chill while you prepare the filling.
- Step 2: In a large bowl, beat the softened cream cheese with powdered sugar and vanilla extract until smooth. In a separate bowl, whip the chilled heavy cream until stiff peaks form, then gently fold it into the cream cheese mixture. Stir in the lemon juice for a hint of brightness.
- Step 3: For the dragon fruit layer, dissolve the gelatin or agar-agar in warm water, then add it to the pureed dragon fruit along with the optional powdered sugar. Mix thoroughly to combine.
- Step 4: Fold the dragon fruit puree into the cheesecake filling until evenly incorporated.
- Step 5: Spoon the cheesecake filling over the chilled crusts in the muffin cups, smoothing the tops with a spatula. Refrigerate for at least 4 hours, or until fully set.
- Step 6: Before serving, garnish with fresh dragon fruit cubes, mint leaves, and a dollop of whipped cream if desired.
Tips & Variations
- Chill the cheesecakes overnight for the best texture and flavor.
- Substitute mango, berries, or coconut for the dragon fruit to create different tropical variations.
- For a vegan option, use dairy-free cream cheese and coconut cream instead of heavy cream.
- If you prefer a firmer filling, increase the gelatin slightly, but be careful not to overdo it to maintain creaminess.
Storage
Store the mini cheesecakes covered in the refrigerator for up to 3 days. For best results, keep them chilled until ready to serve. To reheat slightly, let them sit at room temperature for 10–15 minutes; avoid microwaving to preserve texture.
How to Serve
Serve this delicious recipe with your favorite sides.
FAQs
Can I make these cheesecakes without gelatin?
You can try using agar-agar as a vegetarian alternative, but it will need to be prepared carefully to set correctly. Without any setting agent, the filling may be too soft to hold its shape.
Can I prepare these in advance?
Yes, these no-bake cheesecakes can be made a day ahead and stored in the fridge. Chilling overnight will improve the flavor and texture significantly.
Print
No-Bake Dragon Fruit Mini Cheesecakes Recipe
- Total Time: 4 hours 20 minutes
- Yield: 4 mini cheesecakes 1x
Description
These No-Bake Dragon Fruit Mini Cheesecakes are a delightful tropical treat featuring a creamy, smooth cheesecake filling layered with vibrant dragon fruit puree on a crunchy graham cracker crust. Perfectly chilled and garnished with fresh fruit and mint, these mini desserts are ideal for summer gatherings, parties, or a quick and refreshing indulgence.
Ingredients
For the crust:
- 1 ½ cups graham crackers, crushed
- 5 tbsp unsalted butter, melted
- 2 tbsp sugar
For the cheesecake filling:
- 2 cups cream cheese, softened
- 1 cup heavy cream, chilled
- ¾ cup powdered sugar
- 1 tsp vanilla extract
- 1 tbsp lemon juice
For the dragon fruit layer:
- 1 large dragon fruit, pureed
- 2 tbsp powdered sugar (optional)
- 2 tsp gelatin or agar-agar
- 3 tbsp warm water
Garnish (optional):
- Fresh dragon fruit cubes
- Mint leaves
- Whipped cream
Instructions
- Prepare the crust: In a bowl, combine the crushed graham crackers, melted butter, and sugar. Mix well until the crumbs are evenly coated. Press this mixture firmly into the bottoms of muffin cups to form an even crust layer. Place the muffin tin in the refrigerator to chill and set while you prepare the filling.
- Make the filling: Using an electric mixer, beat the softened cream cheese with the powdered sugar and vanilla extract until smooth and creamy. In a separate bowl, whip the chilled heavy cream until soft peaks form. Gently fold the whipped cream into the cream cheese mixture until fully incorporated. Stir in the lemon juice and set aside.
- Prepare the dragon fruit layer: In a small bowl, dissolve the gelatin or agar-agar in warm water and let it bloom for a few minutes. Puree the dragon fruit until smooth, then mix in the optional powdered sugar if desired. Warm the gelatin mixture slightly to fully dissolve it, then stir it into the dragon fruit puree evenly.
- Assemble the cheesecakes: Spoon the cheesecake filling evenly over the chilled crusts in the muffin cups, smoothing the tops with the back of a spoon. Carefully spoon or gently layer the dragon fruit puree on top of the cheesecake filling if layering separately, or fold dragon fruit puree into the cheesecake filling before spooning as per preference. Refrigerate the assembled mini cheesecakes for at least 4 hours or until fully set.
- Garnish and serve: Once set, remove the mini cheesecakes from the muffin tin. Garnish each with fresh dragon fruit cubes, a few mint leaves, and a dollop of whipped cream or a drizzle of honey if desired. Serve chilled for a refreshing tropical dessert.
Notes
- For best results, chill the cheesecakes overnight to allow the flavors to meld and the texture to firm up perfectly.
- Feel free to customize this recipe by substituting dragon fruit with pureed mango, mixed berries, coconut, or even a drizzle of chocolate for different flavors.
- To make a vegan version, use dairy-free cream cheese and substitute heavy cream with coconut cream. Use agar-agar as a gelatin substitute to keep it plant-based.
- Prep Time: 20 minutes
- Cook Time: 0 minutes
- Category: Dessert
- Method: No-Cook
- Cuisine: International
Keywords: dragon fruit dessert, mini cheesecakes, No-Bake Dragon Fruit Mini Cheesecakes


